Ever heard:“Experience is the best teacher, as long as it’s someone else’s experience?"Unfortunately or fortunately, depends on how you look at it, we’ve had the experience of meeting with potential clients who are looking for a wireless network solution to provide either indoor or outdoor wireless access when they already have a solution (or two) in place.

Typically it’s a university or a K-12 school who is making the upgrade. Why? The challenge is that when they built their first school wireless network it was designed for either indoor wireless or outdoor wireless, but now they need both. Either the product manufacturer only offered indoor access or outdoor access points or if they had both but they were a separate system, which is cumbersome to put it mildly.
So —from our experience (and our customer’s experience) — we offer some important guidance on outdoor wireless.
Here are five things that are critical to implementing a great outdoor wireless network:
1. A Single Platform
A single platform that can handle the outdoors as well as the indoors. It’s fairly obvious but too often we have seen that clients have not made this a factor in their search for a WLAN solution. Having two disparate systems increases administrative overhead, training requirements, physical space, power and cooling demands, purchasing processes, licensing and supports costs, the list goes on and on.
2. One Network Management Interface
One Wireless Network Management interface for the network(s). Both wireless environments, indoor and outdoor, should be manageable by one interface and allow for combining the network or managing them separately. For instance, if I walk out of the building while on a VoIP call the call should be drop free even though I am moving from the inside to the outside. This is only achievable if I am on one platform for both environments.
3. Access Point Models
An array of access point models for both indoor and outdoor. Your wireless network vendor should provide a range of access point models that are designed for the type of environment they will be in. This will allow you to be flexible in the way you deploy your network(s).
For instance a typical outdoor access point will be ruggedized for extreme temperatures and the elements while and indoor access point is designed for simple installation on the ceiling and does not have the ruggedized features of the outdoor access point. The ruggedized access points are also going to be much more expensive than the indoor access point.
So what happens when you want to provide access outside a library building or an athletic complex? If your vendor locks you in to only using an expensive, ruggedized, outdoor access then you are going to have a costly deployment. Whereas if you had the option to install an indoor access point inside the building and extend the antenna cable to the exterior of the building with an outdoor antenna you will have much greater flexibility in the cost of your deployment. Only a vendor with a good selection of both environment access points will provide you this.
4. A Mesh Option
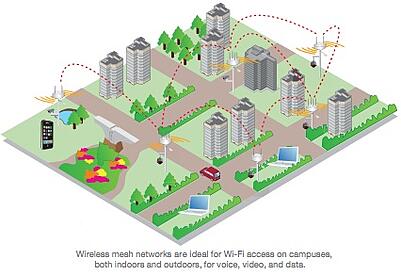
A built in mesh option for the AP function. With mesh built into the access point as a deployment mode your installation options open up. Some areas for outdoor wireless will be impossible or impractical to run wire to. In that instance a mesh option will allow you to deploy access points as a mesh network where they only require power. They will talk to wired mesh access points (gateways) over a radio or channel and provide links for their clients’ traffic to traverse back to the wired network.
5. RF Map or Plan Tool
A built in RF map or plan tool to see your RF network real time. A built in RF map or plan will give you a visual interface to see your access point coverage and performance in real time. This is an invaluable component because RF is invisible to the naked eye. You can’t wander out to the campus quad and see the RF heat signatures without some type of tool.
You could walk around for hours and take measurements with your netbook, smartphone, tablet or laptop but that is too time consuming. A good tool comes integrated with the solution and offers the ability to load floor plans, campus maps or Google Earth maps into to the tool and overlays the access point locations and heat signatures on top of these.
Check out our Free Wireless Network Design Guide for Schools for more tips on what your wireless solution should provide you to make your wireless deployment great.


